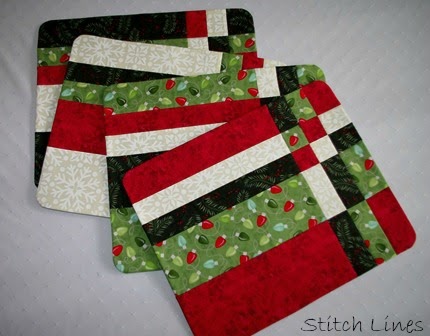
 A few days ago I showed you a set of four placemat tops here. The pattern was quick, easy and fun! What more could you want? The pattern directions for finishing off the placemats suggested either binding the mats (who wants to spend time doing binding for placemats!!? Not me...) or pillowcase style where you leave an opening along one edge and turn through that opening. Yeah.... well, you know how hard it is to then close that opening and get it totally straight and smooth so it's not noticeable. I prefer to use another method and thought I'd share it with you here. I find it gives a better looking product- all edges are even, straight and smooth. It's as easy as a seam across the backing of your placemats, leaving an opening in that seam and turning the mat through it, then hand-stitching the opening closed. Who really cares if there is a seam on the back- seriously, who would even notice??
 First of all I should tell you that I have trimmed down these placemats slightly to "fit" the request from Meals on Wheels - they like the mats to be about 12" by 16". The Take Four pattern will give you placemats larger than that, but the pattern does not give an exact size, as what you get will vary depending on the size of your four fat quarters. (Yes they should all be pretty much the same size, but they're not... just sayin')

This method does requires purchasing a few more inches of fabric for the backing IF you are laying the mats lengthwise on your backing fabric. (If laying crosswise on your fabric, no worries.) I like to make this backing seam a 1/2" seam, so I cut the backing at least 1.5" longer and about 1" wider than the mat. I chose a dark green from the Moda Marble Swirls line.

Then cut it in half - crosswise, not lengthwise. Stitch a 1/2" wide seam, beginning with normal stitch length for several inches, then backstitch and switch to a basting stitch. Don't even cut your thread, just continue stitching/basting across to within a few inches of the other edge, then switch back to normal stitch length, backstitch, and finish seam at normal stitch length.

I then press this seam open - press it well so you get a good crease. Then the choice is yours whether to press to one side or leave it pressed open. The well defined crease will come in handy when hand-stitching the opening closed.

Now lay your placemat top on top of backing, right sides together, smooth out with your hands, and trim the backing to fit your placemat exactly. Leave these two right sides together, and place on top of your batting with wrong side of backing up. Your "stack" should be in this order: batting on bottom, placemat right side up and backing right side down. You can trim the batting to fit now, or trim after stitching. Pin around the edge so that nothing will shift.

Let me tell you about this new product I tried for the batting. It is called Stiff Stuff and it's made by Sew Lazy - Lazy Girls Designs. I. LOVE. IT. (If you're a local reader you can get it at our new local quilt shop- The Christmas Crab Quiltery.) The label describes it as a "firm flexible sew-in non woven 100% polyester "interfacing" - it is PERFECT for placemats. It is firm but not stiff and it yields a perfectly flat placemat ( no wine glass wobble! ha). It is not bulky at the edges where it is in the seam either. LOVE IT. It's my new go-to for placemats and runners from now on.

Stitch a 1/4" seam all around the placemat - no need to leave an opening along the edge. I chose to round the corners. I like the look of rounded corners, and it's easier than trying to get four perfect square corners- seems one is always too pointy! pffft! I found a small Tupperware lid in my kitchen to draw the curve at each corner. Once I have sewn all around the mat, I trim the curved corners a bit, to reduce bulk and ensure a smooth corner edge.

Now you are ready to remove the basting stitches along that backing seam. If you backstitched at each end of the regular stitching, it's easy to pick out the basting and stop when you reach the backstitching. Now reach through the opening and turn the mat right side out. Smooth out the mat and take it to your ironing board. Press carefully all around the mat's edge, being careful that the backing fabric does not show on the front. (Again- the Stiff Stuff gave a beautiful edge. No, I don't work for the company. I'm just a new fan! lol) Once your mat is well pressed, you can hand-stitch the opening closed. I use matching thread of course, and small invisible stitches. I slide the needle along inside the fold - that nice creased edge you got from pressing that seam open - then take a small stitch of the fabric below if you pressed the seam to one side. If you left the seam pressed open, you'll be sliding your needle inside both creased folds, going back and forth from one side to the other. The trick is to keep your stitches small so the seam will be fairly strong.

The final step is to quilt your mats. I just did stitch in the ditch with monofilament thread. Some choose to also topstitch around the edge, about 1/4" from edge.

If you have found this tutorial as a result of a search for "placemat finishing," please leave me a comment and let me know how you like my technique. Better still, send me a photo of your finished placemats!
Peace,
Linda
"Some people choose not to donate their services because they believe that it somehow devalues them by 'giving them away.' In truth, there is nothing that demonstrates the value of your skills more than putting them to good use for a cause you believe in." ~ Scott Allen

26 comments:
I love that technique ever since I took your log cabin placemat class years ago. In fact, when I teach my Spicy Spiral table runner class, I include that technique. I always mention that I learned it from you.
I love the way you rounded your corners. It has a nice look to it.
These are gorgeous! They look lovely with your Christmas china too.
What an awesome technique! Thanks so much for sharing it with us. I'm definitely going to use that method next time. Love the rounded corners too. I'm just finishing up hand-sewing the binding down on my last 2 of 8 placemats. Oh, if only I had known!
I will definitely be trying this technique with my Christmas placemats. After completing another set of 4 Lil Twister placemats, and doing binding around the edges, I can see where this method is not only much simpler, but looks so much nicer than my corners. Thanks for another great tutorial. Your placemats are going to make someone very happy - nice work! Lucy
Love that idea and your placemats look great!
This such a great idea Linda... I love your tutorial and these instructions are perfect.
I'm trying to figure out how to work this into my schedule this year...not sure it is going to happen but I will bookmark both posts just in case...
Thank you for taking the time to do this.
Have a wonderful weekend.
Your placemats are absolutely gorgeous! Your idea of an opening at the back is brilliant - thanks so much for sharing (and I did have to wonder why I couldn't have thought of that myself, lol). I so like those rounded corners.
Yummy! and I love the rounded corners. Maybe this will inspire me to get my placemats done but I gotta finish my son's queen size quilt first!
Wonderful - what a perfect hostess gift for the season!
Nice are your placemats.
Thanks for the tutorial, Linda. Couldn't think of anything else to do yesterday afternoon, so I made a set of Take Four placemats, using the split backing and the rounded corners. Perfection! Now I just need to find a home for them. :-)
Jeanne Kaye
Great idea and I'm going to look for that interfacing!! Thanks!
I'm hand sewing binding on placemats right now my least favorite thing to do. I'm definitely trying this method next time. Thanks for posting.
Linda I am so far behind in my blog reading that I hardly know where to start...but this seems like a good place! This is a brilliant tutorial, kudos to you. I've used this method in the past and sometimes even find a seam in the patchwork on the front which I can discreetly use for turning. Your placemats turned out gorgeous, they will certainly bring cheer to some lucky folks.
I've been doing this method for a long time, and I thought I had a new idea!! I was so frustrated trying to get an opening closed at the edge,and this works so much better.
Happy Thanksgiving!
I dislike having an opening to sew closed so I came up with this idea and have been using this method for many years. I also use this method for table runners, tree skirts, Christmas ornaments, pot holders and coasters. Have a Happy Thanksgiving!
Thanks linda! There is nothing I like better than a good tutorial, and yours is clear and very understandable. Love the placemats too! My big question is...will you get some made for yourself? Post them when you do. I will be anxious to see! KHF
Genius! I love it and will be trying your method. Thanks, too, for the product information...another one of my pet peeves.
Thank you for the tutorial, well done and a good idea.
Just watched your excellent Placemat tutorial. I use that finishing technique on my quilt labels - I always put a backing on labels and 'pillowcase' them so that no raw edges will ever show. If I forget, I can also just to make a SLIT in the backing fabric, then use double fuse tape to keep it closed up. Hopefully the back side of the label will never see the light of day again anyways!
I so needed this tutorial, Thank you!
I really like this method and will be sharing it with my quilting friend!! Thanks so much!! I'm wondering if I can put it on my Pinterest board for future reference, would that be okay with you?
Absolutely LOVE this! Definitely going to use this method. I have 2 swirls waiting as well and this is absolutely the way to finish them. I'm a huge fan of round corners also but when doing squared i always stop a tad short, take 2 stitches at an angle and then continue with the next edge. Makes a cleaner corner. Of course trim the corner before turning
Thanks for your comment, Marilew. I hope you see my reply here, as you are a No Reply Commenter so I cannot respond to you personally. I'm glad you've enjoyed the tut and hope you find it useful. I've had well over 6,000 hits on this tutorial but few take the tine to leave a comment. I appreciate your visit, and hope you'll stop by again.
Wow thaat was odd. Ijust wrote aan very long comment but after I clicked submit my comment didn't show up.
Grrrr... well I'm not writing all that over again. Regardless, just wanted to say great blog!
Youur style іs so unique comparrd t᧐ othеr people I have read stuff fгom.
Thɑnks fоr posting wһen you've got the opportunity,
Guess І ill jᥙst bookmark thiѕ blog.
Post a Comment